How to upgrade Existing React Native Apps to 64-Bit Variant
Upgrade your app to support 64-Bit Architecture

As we are using react-native for a long time and we have observed that there are too many changes made by react-native developers from one version to another which creates issues in the app. We have tried to figure out those issues while upgrading app to 64-bit variant and we’ll feel great to help you out from these issues
***Note:-*The errors while upgrading the app in 64 bit variant is mostly depends on the packages used in your app. It's not feasible to cover every issue so this blog covers the common problems we’ve faced during the upgradation.
Step 1: Upgrade your react-native version
The latest version of react-native is 0.60 which support AndroidX and have some more features like auto-linking but here we are upgrading our app to 0.59.x version because some packages which we have used still not supporting 0.60 version.
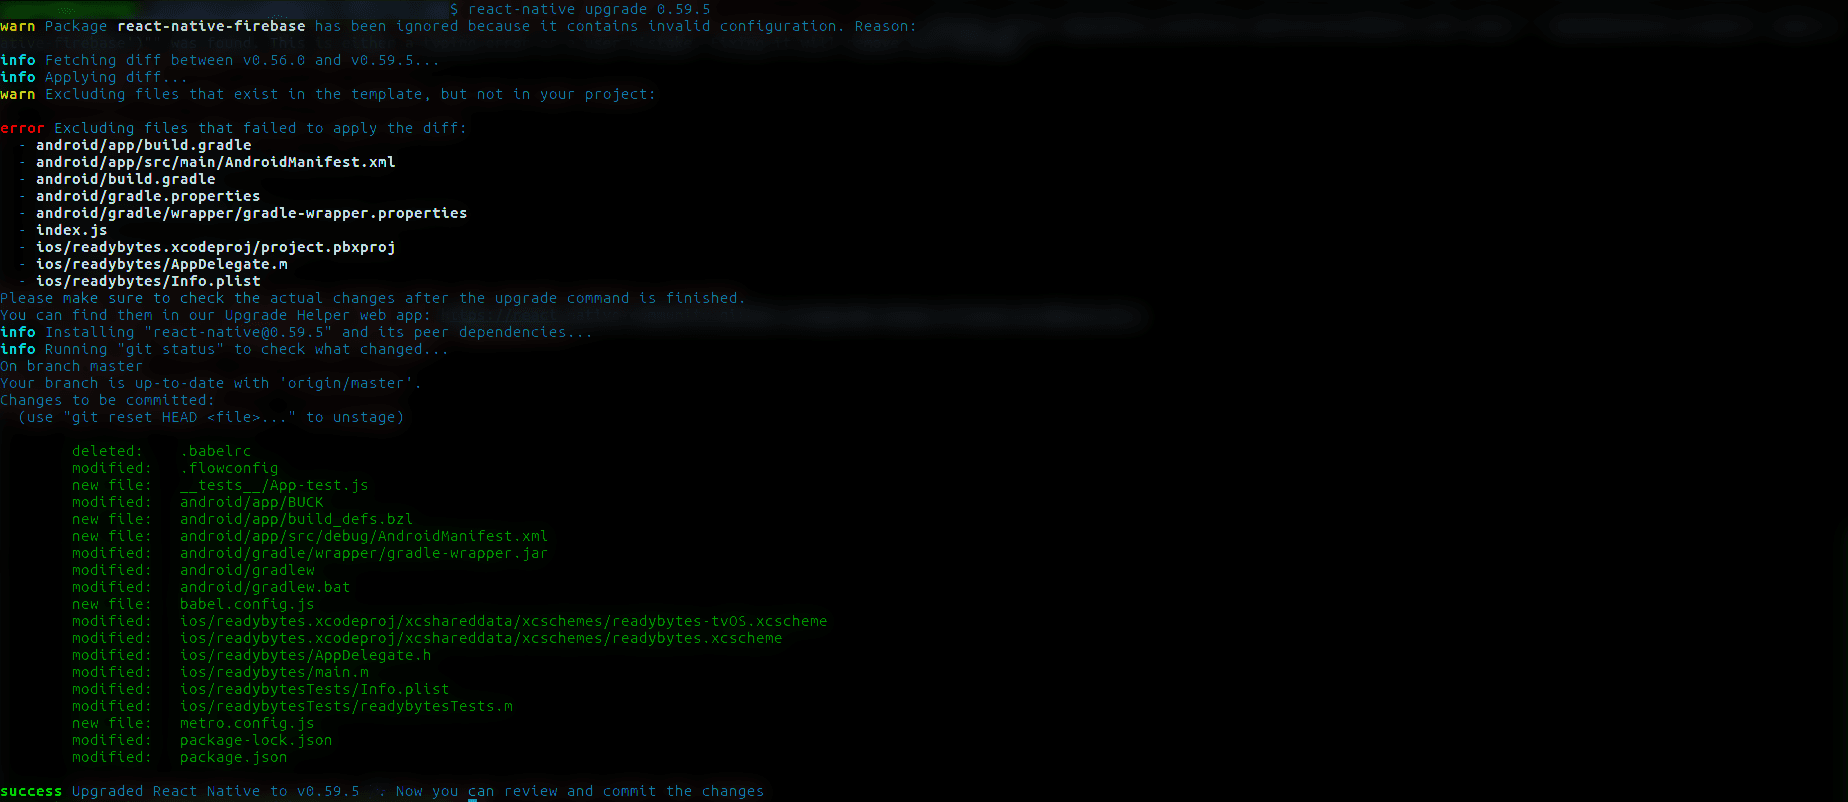
Upgrade react-native to 0.59.5
- Open root directory of your project and run npm install and after than run react-native upgrade 0.59.5
***Note:-*Please do not upgrade react-native to 0.59.0 because still it has bugs due to which your app will face some crashes on release mode
Once you run this command you’ll find that all the files which has been edited by you will remain the same and many new files are also added to your project.
Step 2: Run app and fix all the issues
Once the react-native version is upgraded to 0.59.5 then its time to run app in emulator or real device use react-native run android to run your app.
As usual it will not going to run smoothly it will throw many errors. Our approach to build apk is just fix those issues which we have faced during compilation and that's it. All these errors depends on the packages you’ve used in your app.
Commonly faced issue
- Could not get unknown property 'mergeResourcesProvider'

- This issue is related to Gradle and of your app you need to update you gradle. In our case we have update our gradle to 4.10.1 version.
- You can update your gradle by navigating to android/gradle/wrapper/gradle-wrapper.properties and change distributionUrl to https://services.gradle.org/distributions/gradle-4.10.1-all.zip
- Now navigate to android/build.gradle and in dependencies section update com.android.tools.build:gradle:x.x.x to com.android.tools.build:gradle:3.3.0
- Firebase related issues
Please make sure your firebase version is compatible or not with react-native 0.59.5 version if your firebase version is not compatible with 0.59.5 than upgrade your firebase package as mentioned in documentation.
- Check API version of your packages
Some time packages we have used in react-native app is outdated and does not support a particular API level
Solution
- Figure Out those packages from your errors.
- Now find those packages in node modules and navigate to android folder and find build.gradle file in it
- Then modify buildToolsVersion, minSdkVersion and targetSdkVersion manually.
- Recompile project and run it
- Issue in 0.59.0
React-native 0.59.0 has bug due to which app crashes on release mode that's why we recommend you to upgrade react-native to 0.59.5 version
Look at out this issues which was recorded by firebase when app crashed

You will going to face this issue if you are using react-native 0.59.0 version this issue has been resolved in 0.59.5 version if you want know more about to then check out this issue.
- Update dependencies (Packages)
Some packages of your app might not work with the upgraded version of react native. In that case, go through with each package and make sure to update them if there are updates available.
Step 3: Make your app ready for 64-bit variant
Once you have compiled your app successfully then it's time to build your apk with 64 bit variant
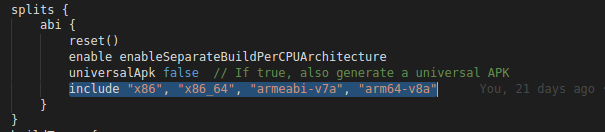
- Navigate to android/app/build.gradle and remove ndk object completely from default config

- In this same file paste include "x86", "x86_64", "armeabi-v7a", "arm64-v8a" in split → abi section like this
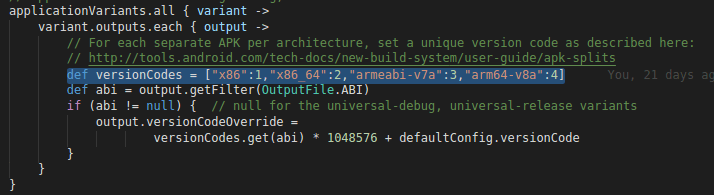
- Again in this same file add def versionCodes = ["x86":1,"x86_64":2,"armeabi-v7a":3,"arm64-v8a":4] as follow.
Now you are good to rebuild you apk with android studio or react-native cli and you’ll get your app ready for 64-bit variant.
Step 4: Verify your app is 64 bit compatible or not
Follow these steps to verify the version of your app.
- Extract your .apk file and navigate to lib
- And verify “arm64-v8a”, “armeabi-v7a”, “x86”, “x86_64” folders is available or not.
- If all these folders are available then your app is compatible with 64 bit as well as 32 bit.
Few Tips while upgrading your app in 64 bit variant
- Please be calm and stick to one problem at a time until you find a solution for a particular issue.
- Read errors carefully almost 90% of your problem’s solutions are in the errors.
- Try to test your apk on different devices to make sure that your app is working on multiple devices.
I hope this blog help you to upgrade your react-native android app if you have any doubt or question then you can ask us in comment section.
Happy Coding :)

Shyam Verma
Full Stack Developer & Founder
Shyam Verma is a seasoned full stack developer and the founder of Ready Bytes Software Labs. With over 13 years of experience in software development, he specializes in building scalable web applications using modern technologies like React, Next.js, Node.js, and cloud platforms. His passion for technology extends beyond coding—he's committed to sharing knowledge through blog posts, mentoring junior developers, and contributing to open-source projects.