How to setup react-native-localization for react native app?
Hassle-free set up of react-native-localization in both Android and iOS
Step 1: Open your react-native project
- If you have already a react-native project then open root directory of your package
- In case if you didn't have created a react-native project then use
react-native init project_nameand then navigate to your root directory bycd project_nameand runnpm installfor initial setup.
Step 2: Install react-native-localization package in the project
To install the react-native-localization run npm install react-native-localization --save in root directory of your project.
Step 3: Link react-native-localization package in the project
For Android App
To link react-native-localization app on android use react-native link react-native-localization and it will apply all the necessary changes to link your library on the Android app. In case if automatic linking creating the issue in android app then try manual linking as mentioned in react-native-localization docs.
For iOS App
Linking Issue in iOS
When you run react-native link react-native-localization command then it also applies the changes on ios app which created an issue in our case. It creates an entry in project_name → ios → podfile

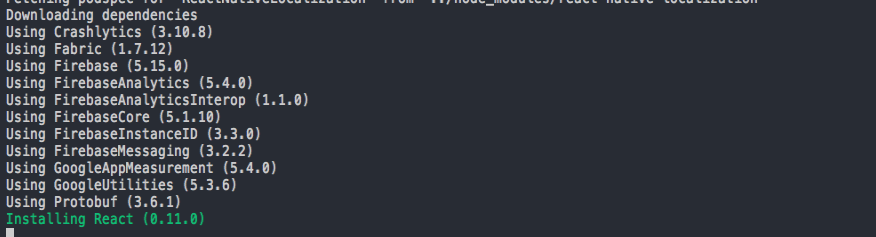
Here ReactNativeLocalization is pointing to project_name/node_modules/react-native-localization directory. Due to this line, whenever we run pod install command then there is one dependency i.e. React is going to be reinstalled in your pods as you can see in this image.
This duplicate package in pods sometimes create issues like multiple command produced with libReactNativeLocalization.a and when you remove this library from xcode → target → Build Phase → Link Binary with Libraries then it will create another issue like no such file or directory: '/Users/...../DerivedData/myproject/Build/Products/Release-iphonesimulator/libReactNativeLocalization.a'.
Solution for Linking Issue in iOS
To overcome from this issue, follow the below mentioned steps:
-
After running
react-native link react-native-localizationcommand, navigate toproject_name → ios → podfile. Remove or commentpod 'ReactNativeLocalization', :path => '../node_modules/react-native-localization' -
Once you remove or comment this line, then run pod install command. Now no duplicate dependency will going to install. It will fix
multiple command producedproblem. -
Now it's time to link
react-native-localizationlibrary manually from Xcode. To link this library manually, openproject_name → ios → project_name.xcworksace(if exist) orproject_name → ios → project_name.xcodeproj(if .xcworkspace file doesn't exist) file in Xcode and select your target. -
After that in project navigator right click on library and select
Add Files to project_nameand after that navigate toproject_name → node_modules → react-native-localizationand selectReactNativeLocalization.xcodeprojfile. -
Now navigate to project
Target → Build Phasesand expandLink Binary With Librariesafter that click on plus icon and addlibReactNativeLocalization.alibrary
Step 4: Build and Archive the App
Now you can clean the build by clicking on Product → clean build folder and build the app from Product → Build.
That's it and now the app will start running without any error.

Shyam Verma
Full Stack Developer & Founder
Shyam Verma is a seasoned full stack developer and the founder of Ready Bytes Software Labs. With over 13 years of experience in software development, he specializes in building scalable web applications using modern technologies like React, Next.js, Node.js, and cloud platforms. His passion for technology extends beyond coding—he's committed to sharing knowledge through blog posts, mentoring junior developers, and contributing to open-source projects.