How to Push screens in Custom Drawer Navigator of React navigation?
One of the challenging task in React Native development is to handle Navigation and this challenge become more complex if you want customize navigator for your App.
In React Navigation, to move from one screen to another there are broadly two functions :
| this.props.navigation.navigate('RouteName') | this.props.navigation.push('RouteName') |
|---|---|
| It always pushes a new route to the stack navigator if it's not already in the stack, otherwise, it jumps to that screen | The push action adds a route on top of the stack and navigates forward to it. Push will always add on top, so a route can be present multiple times |
While the creation of custom drawer navigator is quite simple but this customization limits the Major feature of React Navigation that is Pushing of Screens, because Drawer Navigation doesn't have any screens inside, so it can't push or pop. Explore the reason in detail.
Since We're unable to use push function in custom drawer navigator, we left with one choice i.e. navigate function. So why not just go with the navigate function? what is the problem in it? let's look what problems will occur after using navigate function :
For example, We have an app and there are three screens in it :
We use custom drawer navigator and props.navigation.navigate() function to move from one screen to another in this app. We entered in the app and we're navigating as follows :
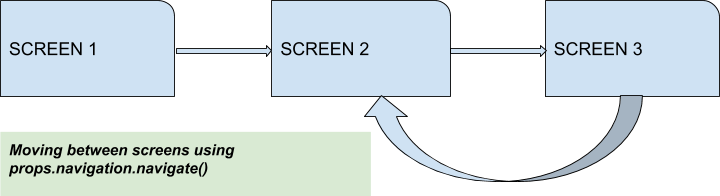
So as if now we're in Screen 2, from here if we want to go back, what do you think on which screen we'll ended up with? SCREEN 3? No, We will back to SCREEN 1.
How does it happen? To understand this, first you need to learn the behaviour of Stack Navigation
As you can observer when we move to screen 2 from screen 3 then screen 2 is not added to the the stack because its already there, since navigate function won't push existing screens.
This behaviour make user experience very painful especially when we have large number of screens. That's why if we want to preserve the navigating state then we must use push function to move between Screens.
So here's the solution to push screens in custom Drawer Navigator :
The Push function will not work in custom Drawer, so we are using StackActions and DrawerActions function. To push screens in custom drawer component follow the below steps:
1) Import the StackActions and DrawerActions2) Create a function to get current route name
3) Now to push screens create a function navigationWithPush()
The above function will push the screen and now let's see what will be the state of our navigation stack when we push screens instead of navigating them

As you'll noticed in the above GIF, when we go back from screen 3 to screen 2, the push function add screen 2 to navigation stack instead of its existence. That's why when we press back button on screen 2, we went to screen 3 instead of screen 1.
Basically, Whenever a user went to any screen the Push function add every screen to its stack actions and preserve the state. Hope this solution works for you.
Drawbacks of Our Approach :
There are some drawbacks in Pushing of Screens :
1) As I've said earlier, the push action adds a route to the stack, so a same route can be present multiple times in the Stack.
2) Due to the presence of the same routers, the memory consumption will be more.
So here's our way to push screens, Hope this solution works for you. If you have queries or improvements, don't forget to mention it in the below comment section.
Happy Coding.

Shyam Verma
Full Stack Developer & Founder
Shyam Verma is a seasoned full stack developer and the founder of Ready Bytes Software Labs. With over 13 years of experience in software development, he specializes in building scalable web applications using modern technologies like React, Next.js, Node.js, and cloud platforms. His passion for technology extends beyond coding—he's committed to sharing knowledge through blog posts, mentoring junior developers, and contributing to open-source projects.