Chrome extension in Vuejs (v.2.x)
how extension can be build effectively using Vuejs.
Let's start by understanding the extension first.
What are the extensions
Extensions are small software programs that customize the browsing experience.
They enable users to tailor Chrome functionality and behavior to individual
needs or preferences.
How to build an extension
Extensions are built in web technology HTML, CSS, and Javascript, just like a
normal web page you build regularly. However compared to web pages, extensions
use a lot of built-in Apis which makes them more interesting.
I hope you know about making a simple extension using the aforementioned technologies.
If not then no worries, here is a good explanation about chrome extensions for us by the mercy of God.
Know a detailed description of chrome extensions.
How to build extensions in Vuejs
Your wait ends here. Let's start exploring Vuejs in extensions.
Before starting, I assumed that you have already installed Npm and Node
Modules in your machine or installed them from
Install Nodejs and NPM.
We also need to install Vue-CLI as well.
$ npm install -g @vue/cli
After completing the installation let's follow the
Vue boilerplate to
quickly install the Vue dependencies.
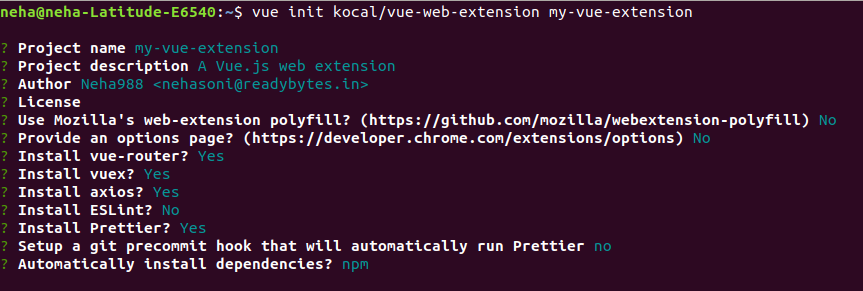
$ vue init kocal/vue-web-extension my-vue-extension
This will ask you a few questions, here is the snapshot of what I answered, you
can handle it as per your convenience.
Now change your directory to the freshly installed Vue-extension.
$ cd my-vue-extension
Here you will see how Vue boilerplate has set up a nice configuration for us to
build extensions smoothly with
Vue Router,
Vuex
and much more. You can check the
manifest.json
file and background.js
file to know the basic configuration about the extension.
To run the extension, we need to make the build of it first by running this command
$ npm run build
When you run this command the boilerplate builds the extension into the dist folder,
it will pipe any .vue files through the Vue-loader and output a JavaScript bundle which
the browser can understand.
Now run the below command which will track your modifications every time you make inside your code.
$ npm run watch:dev
Now let's check how our extension is working.
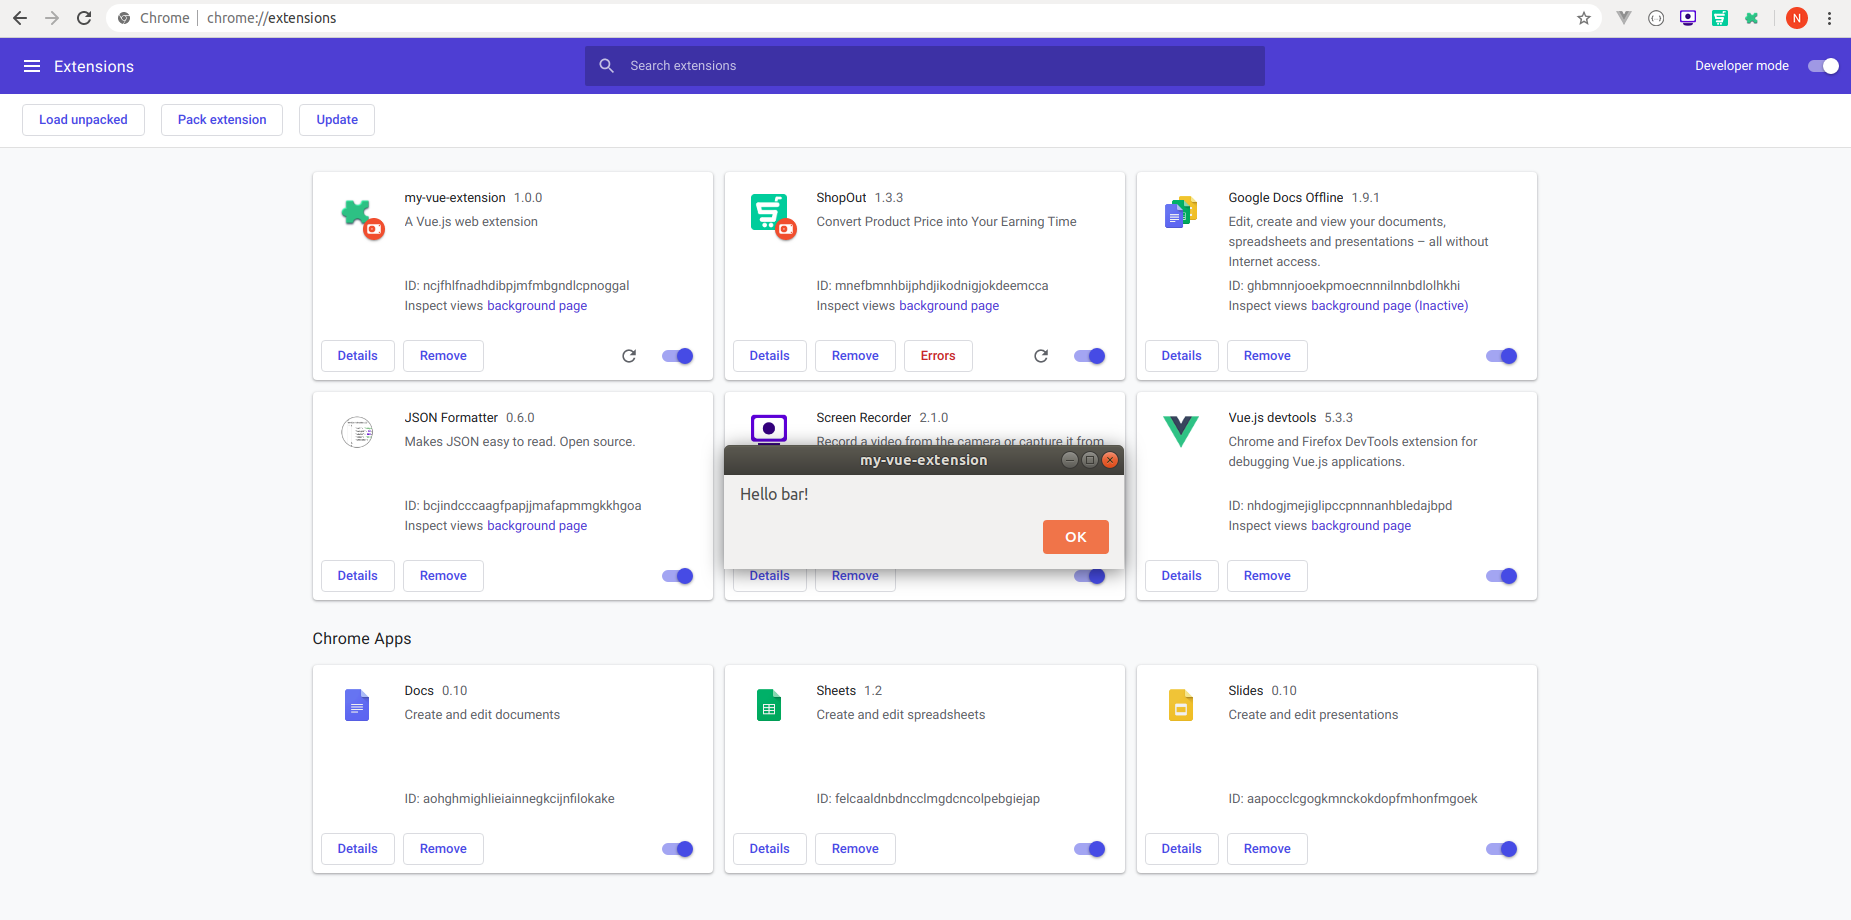
- Open the chrome://extensions/ URL in your browser and toggle on the Developer mode at
the top right corner of the web page. - Now click on the button Load Unpacked at the top left corner. This will open the window
which will say "select your extension directory". - Make sure that you are selecting the dist directory of extension.
- After that, if you see an alert prompt then you have successfully
built your first extension in Vue js.
Let's understand what stuff is going on here -
-
manifest.json -
Contains basic info about the extension. You can see it here.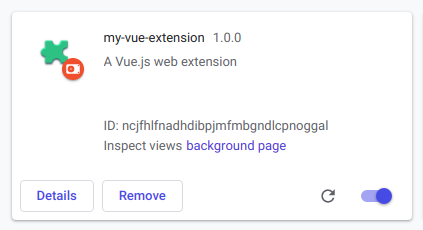
-
background.js -
This script will run in the background every time we load the extension
or on behalf of events defined in the manifest.json file.
(Know more about background events). -
dist -
build of the extension -
store -
Vuex (state,action,mutation,getters etc.) -
popup -
This directory contains two directories -- Vue Router -
The router directory which
defines all the routes inside
routes.js file. - Vue Pages -
the Pages directory
where all the pages can be defined.
When you click on the extension icon at the top right corner you will
get a popup message "Hello World".
Let's try to understand what is happening here.
In popup.js
the Vuex Store
and Vue Router have been imported and the
newly created Vue instance is using id #app (Which is the id of an
element inside popup.html file.)
and it is rendering the component named App.vue in DOM. Here we can see the App.vue
using router-view which imports the component of home path ('/') and at
router.js the home
path is serving the component PageIndex.vue
at location pages/Index.vue
and inside this file the text "Hello World" has written. - Vue Router -
Gotcha !! you figured out how Vue is playing in your extension.
Now you understand how you can make your own components inside the popup directory and
use them on different routes.
How to inject Vue extension into any other web page
You have seen how you can make an extension using Vuejs and run it in your browser.
What if you want your extension to behave differently at different sites ?
For example, If I would say that whenever I opened a URL let's say
https://developer.chrome.com/extensions
then the extension should inject my custom component (any) inside the web page.
This can be done by making a Content Script (Content scripts are files that run in the context of web pages).
So the fun begins from here. Let's grab it.
-
Make a content folder inside the src directory (src/content)
then create a content.js file inside this (src/content/content.js). -
Now open your manifest.json file and do some changes inside it.
You can see that I have given the path of content.js which should be loaded when the web-page
matches the URL https://developer.chrome.com/extensions. -
Now make a component named Content.vue inside the content directory (src/content/Content.vue) and do some stuff inside it.
-
Now paste the below code inside content.js file.
What I am doing here is I import the Vue and
Content.vue component which will render inside
the webpage element having id '#topnav' ( you can take any other element id ). -
Now the last thing to do is update your webpack.config.js file's entry.
which will tell the dist directory
to update itself by giving entry to content.js file. -
Now make a build of your extension by running the command.
$ npm run build -
Go to the URL https://developer.chrome.com/extensions
here you can see that your component is successfully loaded inside this webpage.
Imp: If you can not see the changes at web page then do two things -
- Open your file system and go into your extension directory and delete
the existing dist folder. - Come back to editor and make the build again by running the build command (mentioned above)
- Reload the extension from chrome://extensions/ dashboard.
- Open your file system and go into your extension directory and delete
Congratulations !! You have done a lot.
Conclusion
Hope you were able to find out what you were searching for.
This article is just about the important configurations towards making an extension in Vuejs
and using it on different web pages. Just play by making mini extensions using Vuejs and use your extension
to change the behavior of web pages.
If you find any difficulties in configurations then please let us know in the comment box. We will get back to you ASAP.
Happy codification in extension :)

Shyam Verma
Full Stack Developer & Founder
Shyam Verma is a seasoned full stack developer and the founder of Ready Bytes Software Labs. With over 13 years of experience in software development, he specializes in building scalable web applications using modern technologies like React, Next.js, Node.js, and cloud platforms. His passion for technology extends beyond coding—he's committed to sharing knowledge through blog posts, mentoring junior developers, and contributing to open-source projects.

