5 Optimized Tips to get the most out of PayPlans

1. Remember the Setup- Checklist...? Its for your help:
Yeah, a simple checklist is all that you need to complete to get set go with your subscription site.

After installing just go to PayPlans dashboard. A single click on its configuration tab will open up a checklist we have prepared for you.
As you can see in the red box in the image, amongst all the green ticks 3 Flags are also present (2 red and 1 blue). We will just need to settle those flags to green tick☺ lets see how.
2. Create a Payment Gateway app:
Apps for Payment Gateways are required to generate an integration with a Payment Gateway to collect payments. Multiple payment gateway instances can be added for payment processing. A user should installed the payment gateway apps in which he has an account and wishes to collect the payment through the particular payment gateway.
Since it is the first time that we are installing PayPlans we will need to follow two steps a & b.
- In the Image 1 above a menu list in green box is also visible. It is known as âPayPlans Admin Menuâ . In the menu simply click on the last tab named as App Manager. It is a place where all the supporting apps for Payplans are hosted for you to download.
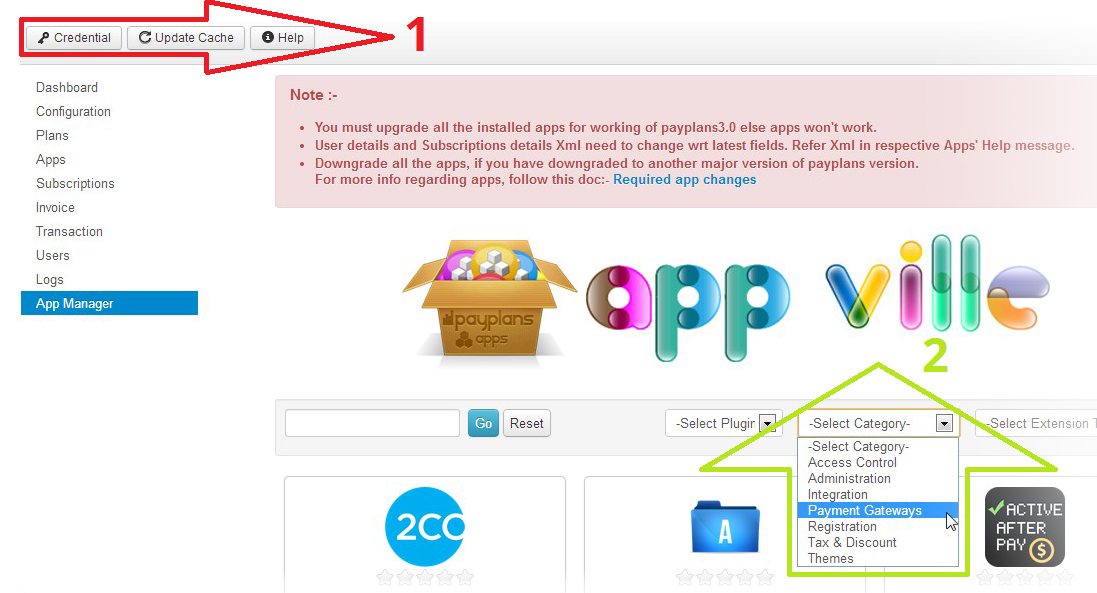
2. App Manager The above image shows the App Manager screen at the siteâs backend. Over here fill in your credentials in the red arrow area marked 1. The credentials are the ones you used to download PayPlans the first time. Those credentials will also be used to download the apps from App Manager.
After the credentials are set you may proceed to the green arrow marked 2. Just install your choice of Payment Gateway integration from a list of 30 available. After installation is complete move to the step bbelow.
- Creating an App Instance -
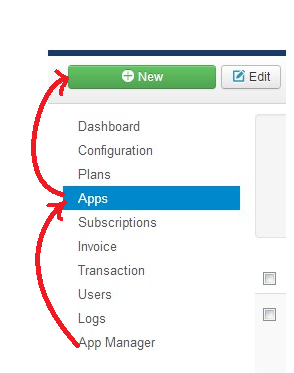
3. App instance creation Once you have installed your favourite Gatewayâs Integration its time to move on from App manager to the tab named App. After the App screen is opened, single click on the New button to create a new app instance. It will open the following screen.
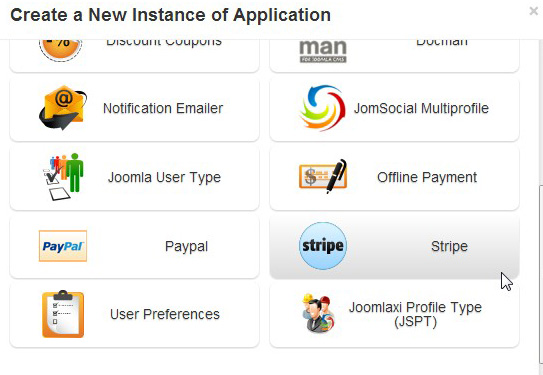
4. App instance creation Click on the Payment Gateway integration which you installed earlier. Over here as you can see earlier I had installed Stripe and now I need to fill in the app configuration details.
The details are simple to fill just a small configuration screen for the usage of the payment gateway App. After you have saved the configurations if you move back to the setup checklist again you will notice that now only two flags remain to be resolved.
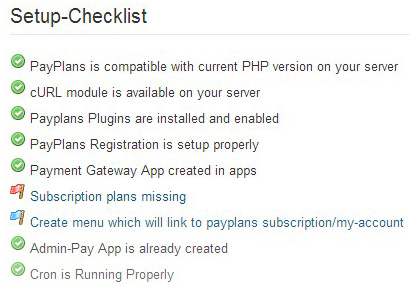
5. Two remaining Flags
3. Create Subscription Plan
Plans are the soul of PayPlans and all the work done above and below are just to maintain the smooth flow of Plan management and this is what PayPlans will show to your end users for selling.
Creating a plan with optimum pricing and features that resonate with your market is very important. So we will look at the basic of plan creation in PayPlans over here.
Now as earlier I would request you to click the next red flag in your setup checklist. It will fly you over to the Plan creation Page and over there you can click on the new button (green color) and start with plan creation.
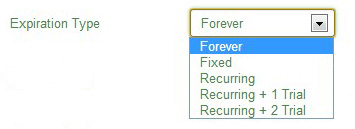
As shown above in PayPlans there are 5 different types of plans based on its expiration type. Let me explain them for you.
-
Forever Plan: It means once this plan is subscribed it will never expire. Unless unsubscribed by the admin from the backend.
-
Fixed Plan: It means the plan will expire in a fixed time after a payment has been done. And obviously the duration and pricing of the plan totally depends on you ☺.
-
Recurring Plan: Once this plan is subscribed it will automatically charge the user for regular price, at a definite set of interval.
-
Recurring + Trial 1: This is same as above only added benefit is that this plan will allow users to try out this plan once by charging it differently at trial time or take a start-up charge. After the trial is over user will be automatically charged at the set interval like recurring plan does.
-
Recurring + Trial 2: This plans is an extension of the above plan in this 2 trial time can be added before the actual recurring plan starts. In simpler terms if admin wants to give his users to try out a plan twice and charge it differently at the 1st trial and 2nd trial, then this plan can be used.
So, these were the plans in PayPlans which you can create as per your needs. The Payment Gateway which we created in our the earlier step will be added as the âCore Application Attached with this Planâ as shown below.

Now two flags out of three are gone, in the setup-checklist. Yes, check it out. Only the last blue one remains.
4. Menu creation
All the plan creations and calibrations up till now were dealing with the backend of your website. But a question arises how to display the plans on the siteâs front end?
The answer is simple click the remaining blue flag. PayPlans itself will take care. A plan menu on websiteâs front end will be linked to PayPlans automatically.
Now all the major hurdles are cleared by you and your site is ready to start selling.
5. Notification Emailer
Yes, you are now set to start earning. Still PayPlans has few tricks up its sleeves.
In todayâs service driven scenario the winning edge is defined by how connected you are with your users or how much awareness your users have about your services. In context to this don't you think if you could mail your users personally on every specific occasion, such as writing a guiding mail to a new user or notifying an existing user about an offer if he renews his plan before the expiration of his subscription.
Isnât that be a great way to connect with your great users?
But, the dilemma - There are too many users for you to connect personally with each one of them. Now, if PayPlans can automate this processâ¦. What if I say you would be able to notify your users by sending them a predefined message template on a pre defined time.
Yes, PayPlans Notification Emailer is capable to do that. You will just be needing to select the Notification emailer in the Image 4 above.
After selecting the Notification app instance a simple configuration screen will pop up on your screen. It will allow you to customize your messages.
We have setup a complete demo site of PayPlans for your disposal. Please have a look at it and try the above scenarios.
Just feel free to try setting up PayPlans and shoot us any query below in the discuss forum.

Shyam Verma
Full Stack Developer & Founder
Shyam Verma is a seasoned full stack developer and the founder of Ready Bytes Software Labs. With over 13 years of experience in software development, he specializes in building scalable web applications using modern technologies like React, Next.js, Node.js, and cloud platforms. His passion for technology extends beyond coding—he's committed to sharing knowledge through blog posts, mentoring junior developers, and contributing to open-source projects.
